How to Build a Class Booking System with Acuity Scheduling

This article was sponsored by Acuity Scheduling. Thank you for supporting the partners who make SitePoint possible.
I recently wrote an article about building an online system to book lessons with a driving instructor. Teaching someone to drive is relatively unique, in that it's guaranteed to be a one-to-one class — or at least, if you did find yourself sharing an instructor's time, then you'd have every right to feel short-changed.
Most other types of class, though, tend to have multiple participants. Unless they're delivered online, they'll most likely have a limit on the number of students due to logistical considerations.
Cookery classes usually have a very well-defined limit on the number of students — you can only really teach as many people as you have cooking stations or cookers. That's going to be the theme of this article — managing those "slots" in a cookery class. The principles remain the same for all sorts of other forms of tuition.
As before, we're going to take advantage of Acuity Scheduling in order to manage bookings for our classes, and everything that entails.
All of the code for this tutorial is available on Github.
What We're Going to Build
Thanchanok delivers Thai cookery classes. There's a general introductory course, as well as two more specialised courses - one covering the many and varied Thai curry pastes, and one that focuses specifically on the region in which she was brought up — the swelteringly hot Northern region around Chiang Mai. She owns a specially fitted-out kitchen to deliver these classes. Each has eight cooking stations. She typically runs around four classes a week — two of those slots for the introductory class which, as you might expect, is by far her most popular.
Currently her website includes an email address and telephone number for making bookings, but there are a number of issues with that. First is that it's easy to forget to update the website to indicate that it's fully-booked, which on occasion has left potential attendees disappointed and with a poor impression of the company.
The second is that she has to rely on good old-fashioned pen-and-paper to manage her list of pupils, along with their contact details and whether they've paid for the lesson ahead of time. She'd very much like to add a feature to her website that allows people to view class availability as well as book online, and to then help her class schedule and attendee lists. That's what we're going to do in the course of this tutorial.
Let's break down the requirements as far as the public-facing website is concerned:
- The website needs to show all of the upcoming classes.
- If a class is fully booked, it needs to say so.
- Classes not fully booked should show the number of available slots.
- Visitors should be able to book a place on classes that have availability.
By integrating all of this with Acuity Scheduling, we effectively get the back-end requirements handled without having to develop it ourselves:
- The number of people who've booked for each upcoming class.
- A list of attendees, along with their contact details.
- Constant updates about upcoming classes and bookings.
- Thanchanok's calendar, all in one place.
Let's get started.
Setting Up Acuity Scheduling
The first thing you'll need to do, if you haven't already, is to sign up at Acuity Scheduling. The free trial will be perfectly adequate for following along.
The next thing we need to do is set up the three classes. In Acuity terminology these are appointment types.
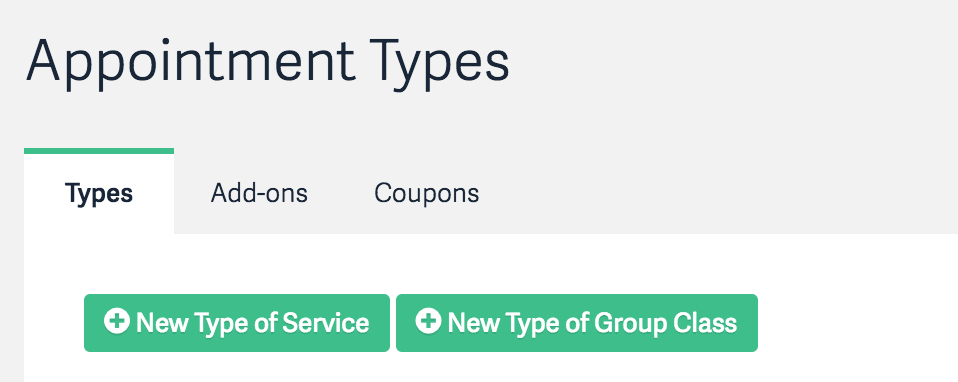
If you've just signed up, click the Create your Appointment types button at the top of the screen, or click Appointment Types under Business Settings on the sidebar.
Next, click the New Type of Group Class button.
You'll need to name the class. For the purposes of this tutorial we'll call them Introduction to Thai Cookery, Thai Curry Pastes and Taste of the North, but you can call them whatever you want.
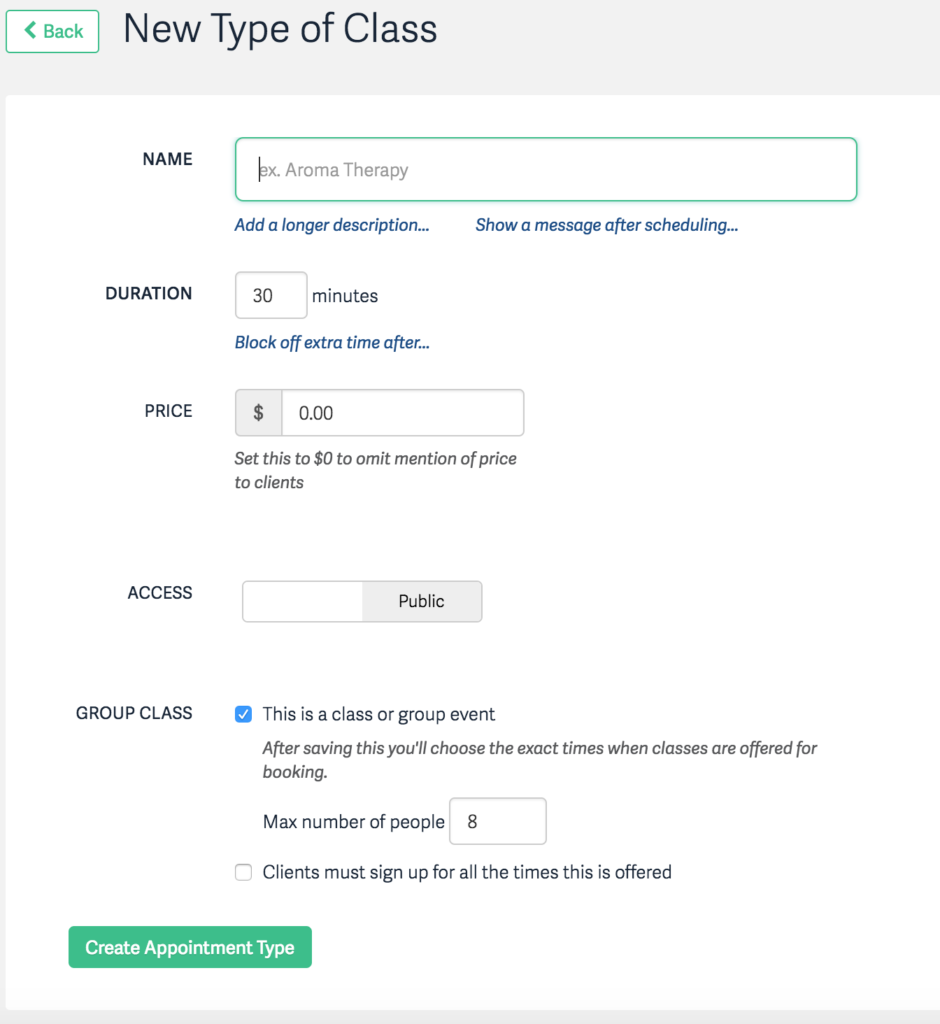
Enter a duration in minutes — for example, 180 — and optionally provide a price. In order to keep things simple, we won't be covering payment.
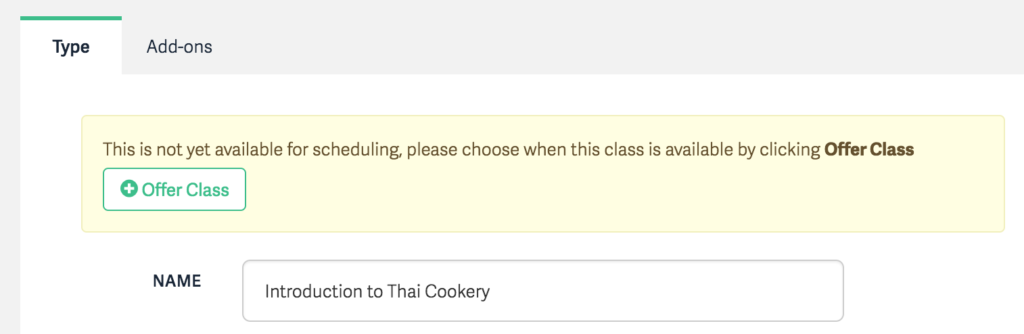
Click the Create Appointment Type button to save the information. Once we've created the appointment type — i.e., the class — we need to provide some dates and times. To do this, click the Offer Class button.
Enter the date and time that the course will run. If it's a regular thing then you can set it as recurring — this allows you to enter multiple dates in bulk. Thanchanok offers the introductory class twice weekly at 1pm, and the other two courses once per week.
Next, go to the Appointment Types and check the three URLs to the newly-created classes. They contain an id query parameter which we'll need shortly, so make a note of those now.
The final step on the Acuity side is to get the API credentials for our integration:
- Click Integrations under Business Settings on the sidebar.
- Click API to scroll down to the relevant part of the page.
- Click view credentials.
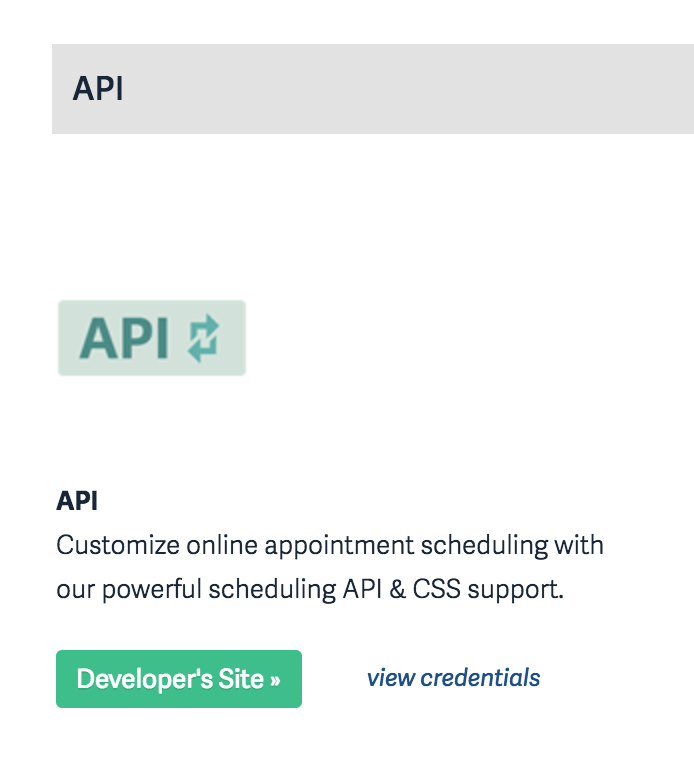
Copy and paste the User ID and API Key for use later.
Beginning the Implementation
For the purposes of this tutorial we're going to use Lumen, although the principles are pretty much the same whatever your framework of choice happens to be.
Start by creating the project from the command-line:
composer create-project --prefer-dist laravel/lumen thaicookery
Create a file in your project folder named .env and add the following lines, replacing the values appropriately:
ACUITY_USER_ID=your_user_id
ACUITY_API_KEY=your_api_key
APP_DEBUG=true
This will allow you to retrieve the user ID and API key like this:
$userId = env( 'ACUITY_USER_ID' );
$apiKey = env( 'ACUITY_API_KEY' );
As I hinted at earlier, we're going to integrate with Acuity Scheduling via the API. This is even easier with an SDK.
There are SDKs for Node.js and PHP on the developer site; we're going to be using the one for PHP. It's avalailable on Packagist, so we simply need to install it using Composer:
composer require acuityscheduling/acuityscheduling
Now we need to make the Acuity Scheduling SDK available throughout the site. The ideal way to do this is to use a service provider to inject it into the application's service container.
Open up app/Providers/AppServiceProvider.php and add a use statement to the top of the file:
use AcuityScheduling;Then add the following to the register() method:
$this->app->singleton( 'AcuityScheduling', function ( $app ) {
    return new AcuityScheduling( [
        'userId' => env( 'ACUITY_USER_ID' ),
        'apiKey' => env( 'ACUITY_API_KEY' ),
    ] );
} );
Now register the service provider by opening up bootstrap/app.php and uncommenting the following line:
$app->register(App\Providers\AppServiceProvider::class);
The next step is to define the classes for displaying them on the site. In practice you'd probably store these in a database, but for the purposes of this exercise we'll simply hard-code them in an array as a property of the base controller — you'll find this in app/Http/Controllers/Controller.php.
Create the array, being sure to substitute your own appointment type IDs:
protected $classes = [
    [
        'name'  =>  'Introduction to Thai Cookery',
        'key'   =>  'introduction-to-thai-cookery',
        'description' => 'A basic introduction to Thai cookery, which teaches you to make three popular Thai dishes - Tom Yum, a ferocious hot and sour prawn soup, a fragrant green chicken curry and a dessert of mangoes with cocounut and sticky rice"',
        'acuity_id' => 3027517,
    ],
    [
        'name'  =>  'Thai Curry Pastes',
        'key' => 'thai-curry-pastes',
        'description' => 'Pestle and mortar at the ready, as we take a look at Thai curry pastes, the foundation of all Thai curries. Specifically, the course teaches you to make red, green and Panang curry pastes. We will also be cooking a roast duck red curry with sticky rice.',
        'acuity_id' => 3027529,
    ],
    [
        'name'  =>  'Taste of the North',
        'key' => 'taste-of-the-north',
        'description' => 'An in-depth look at the cusine of the North of Thailand.',
        'acuity_id' => 3027535,
    ],
];
As you can probably gather from the code, we're defining a key for identifying each course in an SEO-friendly manner, along with some basic information about each class and that all-important appointment type ID that allows us to integrate with Acuity.
Now all of that's set up, it's time to integrate with Acuity Scheduling.
Listing the Classes and their Availability
The first thing we need to do is list the classes, and the dates on which each class is offered. We've already set all of that up on the Acuity side, along with our meta-data, so the next step is to call the API to get the availability. The endpoint for this is availability/classes. The SDK makes calling this a breeze.
availability/classes gives you the classes for a specified month. By default it only includes those classes with available slots, although you can override that behaviour. We'll do that, but mark the ones with no available slots appropriately.
Create a new controller class — app/Http/Controllers/HomeController — and add the following method:
/**
 * Get the available classes for the given month
 *
 * @param Carbon $month
 * @return array
 */
public function getAvailablity( $month )
{
    return app( 'AcuityScheduling' )->request(
        'availability/classes',
        [
            'query' => [
                'month' => $month->format( 'Y-m' ),
                'includeUnavailable' => 'true',
            ],
        ]
    );
}
Now for the homepage. Create a new method called index(), and we'll begin by getting the availability for the current and next month:
/**
 * The homepage
 *
 * @return \Illuminate\View\View
 */
public function index( )
{
    // Get the dates for this month...
    $availability = $this->getAvailablity( Carbon::now( ) );

// ...and next month
    $availability += $this->getAvailablity( Carbon::now( )->addMonth( ) );

}
This will return an array of results. Before we render that out, let's use the power of Lumen's collections to do two things:
- "Inject" a Carbon instance that represents the date and time of each class; this is a property of the results called
time - Group the results by the class; this is represented by the
appointmentTypeIDproperty
Here's the code for that:
// Now go through and inject the date as a Carbon instance, then group by the class
$instances = collect(
    $availability
)->map( function( $instance ) {
    $instance[ 'date' ] = Carbon::parse( $instance[ 'time' ] );
    return $instance;
} )->groupBy( 'appointmentTypeID' );
Finally, return the page:
The layout template isn't included here for brevity, but you can grab a copy from GitHub.
// Return the rendered homepage
return view( 'home.index', [ 'classes' => $this->classes, 'instances' => $instances ] );
Now create a new file in resources/views/home/index.blade.php:
@extends( 'layouts.default' )

@section( 'content' )

<p>We offer three different classes, detailed below.</p>

@foreach( $classes as $class )
    <h2>{{ $class[ 'name' ] }}</h2>
    <p>{{ $class[ 'description' ]  }}</p>
    <ul class="instances">
    @foreach( $instances->get( $class[ 'acuity_id' ] ) as $instance )
        <li>
            <h5>
                <time datetime="{{ $instance[ 'date' ]->toIso8601String( ) }}">{{ $instance[ 'date' ]->format( 'l jS F') }} at {{ $instance[ 'date' ]->format( 'ga') }}</time>
                @if ( $instance[ 'slotsAvailable' ] == 0 )
                    <span class="badge badge-danger">Fully booked</span>
                @elseif ( $instance[ 'slotsAvailable' ] < 2 )
                    <span class="badge badge-warning">Only {{ $instance[ 'slotsAvailable' ] }} available</span>
                @else
                    <span class="badge badge-success">{{ $instance[ 'slotsAvailable' ] }} slots available</span>
                @endif
            </h5>

@if ( $instance[ 'slotsAvailable' ] > 0 )
                <a href="/{{ $class[ 'key' ] }}/{{ $instance[ 'date' ]->toIso8601String( ) }}/{{ $instance[ 'calendarID' ] }}/book" class="btn btn-primary btn-sm">Book Now</a>
            @endif
        </li>
        @endforeach
    </ul>
@endforeach

@stop
The code should be relatively straightforward. We're iterating through the available classes and displaying the information about them. Then we're going through and listing the actual classes along with a label that provides some information about availability, and finally showing a button for booking into classes which have available slots.
You can take what we've done so far for a spin — fire up Terminal and enter:
Continue reading %How to Build a Class Booking System with Acuity Scheduling%